Wireguard: The Road warrior
Tunnels are laid, sites are connected. Now, it's your time to roam! Become the road warrior with Wireguard.
Connect your local and remote site via nifty WireGuard VPN tunnel in just 2 quick steps! Or maybe not...
Connecting your remote locations with your home network has never been so easy!
For quite a long time I've been running 2 sites, my home lab running multiple docker containers, VMs and many more devices that utilized LAN. Then for heavy duty stuff I pay for dedicated servers hosted at commercial datacenters, these run ElasticSearch clusters, Grafana/Prometheus stack and this website for example.
Whenever I needed to connect my "on-premise" stuff with remote infrastructure, I've always done it in a dirty way via SSH tunnels, this most of the time worked fine thanks to combination of autossh running in Docker, but it involved intermediate step of setting up the tunnel, whenever I wanted to connect some service between the sites, which at times could be cumbersome. I always wanted to have a proper site to site connection, but I've never put effort into setting it up, so here we are!
I had prior experience with OpenSSL, but it just seemed too complex for this task. In the past I've also run tinc VPN which I really liked, but I felt like trying something new, so with a bit of searching around I stumbled upon Wireguard.
Now without further ado, let's jump to mine setup.
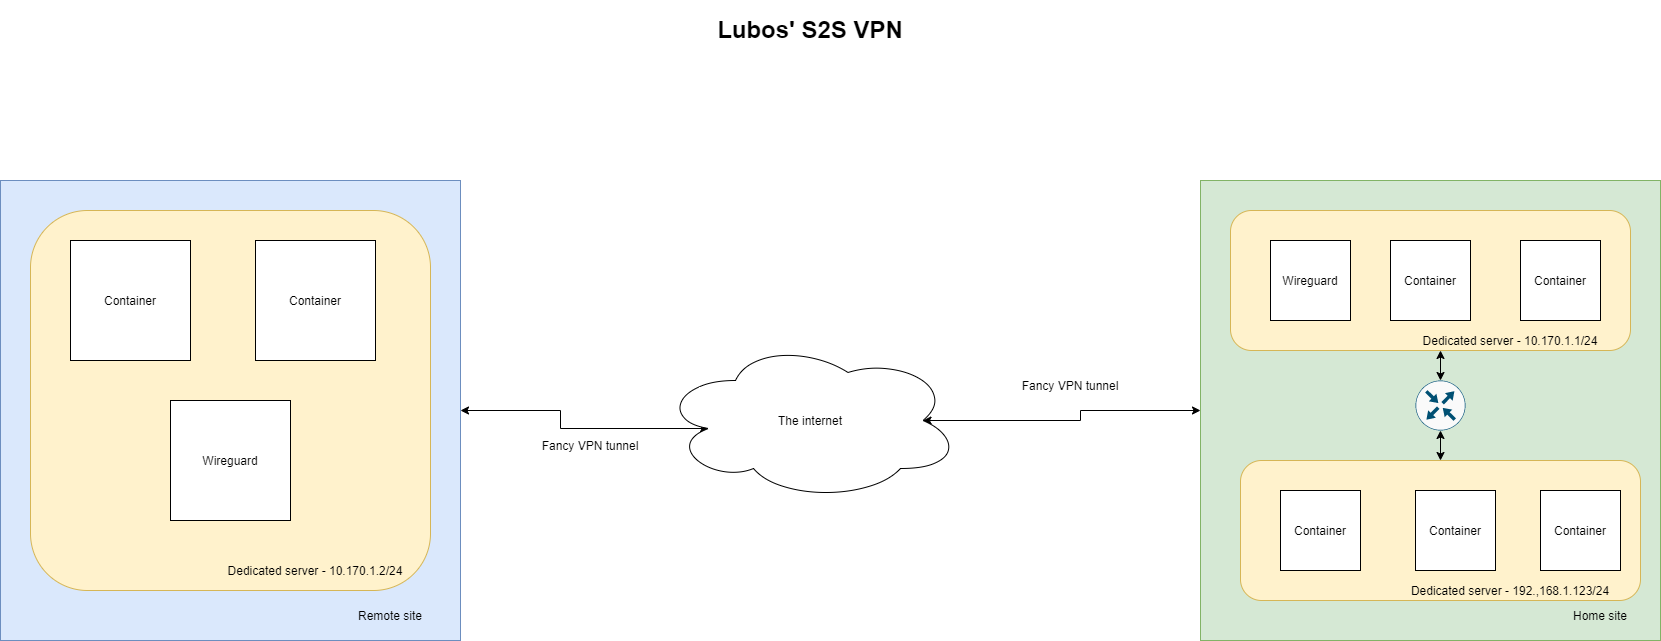
What I need to achieve is to be able to call my home site network(192.168.0.0/16) from my remote site. For example Dedicated server in remote site needs to be able to call a service on my home network directly via it's IP, let's say 192.168.1.200. Here is what I've done to make it work.
First off, we have to install Wireguard kernel module and the tools. I run most of my infrastructure under Debian Stable and at the time of writing this article Wireguard is not in the stable repository therefore I will have to use Backports. Luckily the process is pretty straightforward. If you use anything else refer to: Link
/etc/apt/sources.list:echo 'deb http://deb.debian.org/debian buster-backports main' >> /etc/apt/sources.list
apt update
apt-get -t buster-backports install "wireguard" -y
Now that we have installed all the dependencies let's set this up!
The setup is fairly easy and this is the beauty of using Wireguard, however there are few things that we will cover, as it was not that clear to me from the documentation because I didn't read it thoroughly and I struggled little bit because of it.
As you can see in the diagram I show above, we will have 2 Wireguard peers. But before we proceed to exact configuration steps, we should specify baseline of our setup.
VPN interface: wg0
VPN network: 10.170.1.0/24
VPN port: 51871
Peers should be able to handle traffic for the VPN network itself, but also for my LAN network. Therefore we can say that allowed networks should be: 10.170.1.0/24, 192.168.0.0/16. We will get to why this is necessary to specify later when we go through the configuration file.
As we have sorted out what we want to setup, we can now move to the specific configuration steps. I usually like to keep configuration files together therefore I've created following folder structure on my Peer 1 VM.
root@vpn:/data/containers/conf/vpn.m8.sk# tree
.
├── certs
│   ├── hertzner-box
│   │   ├── hertzner.key
│   │   └── hertzner.pub
│   └── vpn.m8.sk
│       ├── vpn.m8.sk.key
│       └── vpn.m8.sk.pub
├── peers
│   └── wg0_iphone_lubos.conf
└── wg0.conf

5 directories, 8 files
This peer is located in my home site and this is the configuration I decided to go with:
First off every single Wireguard peer needs to have its set of keys, this consist of a public and private key that is used for encryption and decryption of transmitted/received data and it is also used for the peer authentication.
Assuming we are in the folder certs/vpn.m8.sk we can run following command to generate private and public key for my Peer 1
wg genkey | tee vpn.m8.sk.key | wg pubkey > vpn.m8.sk.pub
This will create 2 files that will have private and public key in it respectively:
root@vpn:/data/containers/conf/vpn.m8.sk# cat *.pub *key
mdv9qFDGcfG5ec2Opk/fNhz84albmcdS2dlKoOeSEQg=
yNdDrdkpcIdTyI11fqPDEY2lMk09I+kYbRKjA9yG320=
We repeat the same command, but this time we change to folder certs/hertzner-box and we also adjust the output file names to hertzner.key and hertzner.pub.
In my case I have only 2 peers, therefore I don't need any additional key pairs, however, if you would have more peers you just repeat the commands, you can also run the commands on the any of the peers, or even your machine, if you have wg installed.
Now that we got our key pair we can create our initial configuration, which should look like this:
[Interface]
PrivateKey = yNdDrdkpcIdTyI11fqPDEY2lMk09I+kYbRKjA9yG320=
ListenPort = 51871

[Peer]
PublicKey = FqB69gnqdHtsST7R3QKVMZGNfUTFGFltqrKL343xdy5=
AllowedIPs = 10.170.1.2/32, 192.168.0.0/16
Endpoint = xxx.xxx.xxx.xxx:51871
I store this main configuration inside a file called wg0.conf which is in the base of my main configuration folder in this case /data/containers/conf/vpn.m8.sk
The file follows INI configuration format and consists of two sections: [Interface] and [Peer].
The interface section contains configuration properties for your VPN interface:
PrivateKey property takes the value of your private key that is stored in certs/vpn.m8.sk/vpn.m8.sk.keyListenPort property is the UDP port where you wish to receive VPN traffic.If you follow guides on the Internet some of them also include configuration properties like:
AddressPreUp, PostUp, PreDown, PostDownThese properties are used by the wg-quick tool, but are not valid for the wg command!
The peer section contains configuration properties for your VPN peers, i.e the VPN clients that will connect to this VPN instance. For every single peer(client) that should connect to this specific VPN instance you have to set the [Peer] section.
Peer section holds following configuration properties:
PublicKey holds the value of public key of the peer, in this case that would be certs/hertzner-box.pubAllowedIPs in the context of Peer section acts as a sort of ACL, i.e it tells our VPN instance what packets it should accept. In this case packets coming for 10.170.1.2/32, 192.168.0.0/16 are accepted by the instance.Endpoint property is access interface of your peer, i.e IP and a port combination where VPN instance can send the traffic to.AllowedIPs property has also a second use, when sending the data from the VPN instance to it's peers, in this case the property is used as a sort of routing table, telling our VPN instance that the peer will accept the traffic for networks 10.170.1.2/32, 192.168.0.0/16 This is very crucial to understand when setting up Wireguard as you might run into issues, when AllowedIPs are not set properly.
For more examples I recommend reading the official documentation: Link. This was the part I skipped over initially when reading the documentation and it cost me some trial and error until I fixed it.
Now that we have our Wireguard configuration ready, we can move to setup of our network device that will be used by Wireguard. As promised by Wireguard, this is very simple and all you need is the ip command.
First off, you want to create a new network interface:
ip link add dev wg0 type wireguard
Then you need to assign it an IP address, we decided to use the range 10.170.1.0/24, therefore I will just use the first IP in the range for the Peer 1
ip address add dev wg0 10.170.1.1/24
Once we assign the IP, it's time to load our Wireguard configuration that we have prepared in the last step. Assuming we are in the configuration folder we setup earlier we run following command:
wg setconf wg0 wg0.conf
With all this in place we are now ready to bring up the wg0 interface up on Peer 1. You can do that via following command:
ip link set up dev wg0
What surprised me was the status of the interface after I brought it up, however this is normal:
root@vpn:/data/containers/conf/vpn.m8.sk# ip link show wg0
3: wg0: <POINTOPOINT,NOARP,UP,LOWER_UP> mtu 1420 qdisc noqueue state UNKNOWN mode DEFAULT group default qlen 1000
    link/none
We can now move on to the setup of Peer 2!
I won't go into much details, as most of the details have been covered when we were preparing Peer 1. For Peer 2 we only need to prepare the configuration file and setup the network interface. Key pair doesn't need to be generated as we have already did that on Peer 1, therefore we just need to copy over the values.
Configuration for our Peer 2 should look like this:
[Interface]
PrivateKey = cCPxAr8vKhQtR4fFIgZF/j3cHXcW2oD8XytOHqwFlXo=
ListenPort = 51871

[Peer]
PublicKey = IYFNx4xijfW0805yqfR4NIOz5JrmkPFkB5Y02y6W2AE=
AllowedIPs = 10.170.1.1/32, 192.168.0.0/16
Endpoint = xxx.xxx.xxx.xxx:51871
I will now go briefly over the differences:
PrivateKey should contain the value of certs/hertzner-box.keyPublicKey should contain the value of certs/vpn.m8.sk.pubAs you can see the roles now switched and our home site acts as a Peer of remote site VPN instance. Make sure you don't mix up the keys in this configurations as then the authentication won't work.
Once you are done with the configuration file for the Peer 2 VPN instance we can move onto setting up the network interface.
We will repeat the same commands that we have used for Peer 1
ip link add dev wg0 type wireguard
ip address add dev wg0 10.170.1.2/24
wg setconf wg0 wg0.conf
ip link set up dev wg0
Please note that I have assigned different IP to the Peer 2! In this case second IP from our range, which is 10.170.1.2/24
With all the steps done on all of your Peers we can test the tunnel connectivity. I have no firewalls in place, therefore I just used simple ping from both sites.

As you can see in the picture both sites respond to the ping test! This confirms that we have successfully connected remote and local site. However, we are not done yet! Remember, we wanted to access my LAN network from the Remote site! so let's try that now:

This doesn't work out of the box and we get to why in the next section.
In order to route traffic between our VPN network(10.170.1.0/24) and our LAN network(192.168.1.0/16) we need to setup few things:
Setting up a static route is very simple on all the remote peers run following command:
ip route add 192.168.0.0/16 dev wg0
This will make sure that all the traffic for the 192.168.0.0/16 gets routed through wg0
In order to properly connect two networks together we will have to setup NAT on our VPN instance that is hosted in home site.
Add following iptables rules to enable the NAT:
iptables -A FORWARD -i wg0 -j ACCEPT
iptables -t nat -A POSTROUTING -o enp1s0 -j MASQUERADE
wg0 is our VPN network interface, enp1s0 is your main network interface that can reach your LAN.
Once that is set, you will need to tell the Linux kernel to forward ip packets:
sysctl -w net.ipv4.ip_forward=1
And with this in place we are done!
Now that we have managed to setup everything we can test our setup!
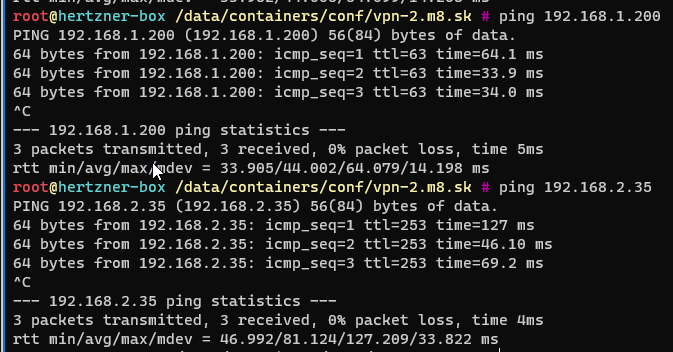
As you can see I am able to ping my LAN network from the remote site, I can even reach my IoT network.
Please note that all the interface configurations that we setup are temporal, meaning that they will go away after you reboot your server. If you would like to see how to set this up permanently please read this article of mine: Persistent routing for your site to site Wireguard VPN
Also the sites are connected one way, e.g I am not able to call VPN network from inside my LAN network, this is something I want to setup in the future.
I've got a bonus!! I did brief tests with iperf3 to test out the network performance. My remote site has full 1gbit connection to the outside. My home site has 300/30Mbit.
I managed to push 229Mbit/s from my remote site to my home site without VPN.

Now the interesting part, tests via VPN. I hit whooping 200Mbit
